How to Move Elements in SVG: Complete 2025 Guide
Want to move SVG elements to create perfect logos? In this complete 2025 guide, learn how to use transformations, SVG animations, coordinates, and more with practical examples. Design easily at creadorlogos.com and take your graphics to the next level.
Why Learn to Move Elements in SVG?
Moving elements in SVG is essential for designing dynamic vector graphics in web programming, such as logos, animations, or interactive icons. Often, it is preferable to modify the SVG file in a professional vector design software like Adobe Illustrator or Inkscape rather than doing it directly via code. However, you can also use our online tool to create and edit SVG logos. Still, it is important to understand how to move and position these graphics through code. You already know how to insert primitive shapes (circles, rectangles), complex shapes (path), images, and videos inside an SVG, and how to display them on a web page. Now you will learn how to position them correctly within the SVG stage to fit your creative vision. Discover more about SVG here.
Methods to Move Elements in SVG
Directly Modifying Coordinates (x, y, cx, cy, etc.)
Every SVG element has attributes like x, y for rectangles, or cx, cy for circles, which determine its position within the SVG stage. Modifying these values allows you to move the element directly. It is important to remember that the SVG coordinate system has its origin (0,0) at the upper-left corner of the bounding box, with the x-axis increasing to the right and the y-axis increasing downwards.
You can adjust these properties manually by opening your SVG code in your favorite text editor. Later, I will explain how to change these attributes via JavaScript to generate dynamic movements, even using data from a database. To better visualize this coordinate system, check the following image:

Code
<svg width="200" height="200" xmlns="http://www.w3.org/2000/svg">
  <circle cx="50" cy="50" r="40" fill="blue" />
  <rect x="100" y="100" width="50" height="50" fill="red" />
   <circle cx="80" cy="80" r="40" fill="blue" />
  <rect x="130" y="150" width="50" height="50" fill="red" />
</svg>Example
How to move SVG elements with coordinates?
Simply change the values of attributes like x or cx. For example, increasing cx shifts a circle to the right, while increasing cy moves it downwards, following the described coordinate system.
✅ Advantages:
- Precise control over position.
- Does not require additional transformations.
❌ Disadvantages:
- Can be tedious to manage multiple elements.
- Not practical for dynamic animations.
Transform Attribute with translate()
The transform="translate(x, y)" attribute moves an SVG element incrementally from its original position. It is one of the simplest and most popular ways to shift elements like rect, circle, or path.
SVG Transformations with translate(x, y)
The transform="translate(x, y)" attribute is one of the most efficient and versatile ways to move SVG elements. Unlike modifying direct coordinates (x, y, cx, cy), this method applies a transformation that shifts the element from its current position without altering its base coordinates.
Key characteristics of translate()
- Relative movement: Applied incrementally from the element's original position.
- Does not affect base coordinates: Original coordinates (
x,y, etc.) remain intact. - Can be combined: Can be used alongside other transformations like
rotate,scale, orskew.
Code
<svg width="200" height="200" xmlns="http://www.w3.org/2000/svg">
<rect x="10" y="10" width="50" height="50" fill="blue"  />
<rect x="10" y="10" width="50" height="50" fill="green" transform="translate(50, 50)" />
</svg>
Example
Why use transform="translate()" to move SVG elements?
This method is more flexible than changing coordinates directly, as it doesn't alter the element's base values and allows relative movements.
✅ Advantages:
- Easy to use and understand.
- Perfect for relative adjustments.
❌ Disadvantages:
- Does not allow direct animations (requires other tools).
- Can become complicated if multiple transformations are combined.
Using <g> Tags (Groups) with transform
The g tag is used in SVG to group multiple elements together and apply collective transformations such as translate(). This allows moving, scaling, or rotating all elements in the group as a single entity.
Different transformations can be applied to each group, allowing elements to be reused with different positions, scales, or rotations. By modifying the parent element with transform, the position of all its children is also modified. This technique is very useful, for example, to move all elements forming an icon or vector set without altering them one by one.
Code
<svg width="200" height="200" xmlns="http://www.w3.org/2000/svg">
  <rect x="0" y="0" width="50" height="50" fill="green" />
  <circle cx="25" cy="25" r="10" fill="yellow" />
  <g transform="translate(100, 50)">
    <rect x="0" y="0" width="50" height="50" fill="green" />
    <circle cx="25" cy="25" r="10" fill="yellow" />
  </g>
</svg>
Example
How to use <g> to move multiple SVG elements?
Grouping elements with g is ideal for keeping a clean design and applying joint transformations without modifying each element separately.
✅ Advantages:
- Allows moving, scaling, or rotating multiple elements at once.
- Keeps the SVG code clean and structured.
❌ Disadvantages:
- Elements inside the group lose relative independence.
- Makes specific individual animations harder.
SVG Animations with <animateTransform>
The animateTransform tag allows animating transformations within an SVG, such as movements, rotations, or scaling. It is used inside the SVG element you want to animate and defines parameters like transformation type, start point (from), end point (to), duration (dur), and whether the animation should repeat (repeatCount).
Although animations are not the main topic of this tutorial, I wanted to include <animateTransform> because it can also be used in a non-animated way. If you omit parameters like dur or repeatCount, a static transformation is simply applied to the SVG object. This technique helps simplify SVG code if you only want to move an object without animating it. However, for static transformations, it is generally recommended to use the transform="translate(x, y)" attribute directly inside the corresponding element, as it is more direct and semantic.
At creadorlogos.com, we use animateTransform to create attention-grabbing animated logos, such as a rectangle sliding back and forth.
Example Code
<svg width="200" height="100" xmlns="http://www.w3.org/2000/svg">
  <rect x="10" y="10" width="50" height="50" fill="purple">
    <animateTransform attributeName="transform"
      type="translate"
      from="0 0" to="100 0"
      dur="2s" repeatCount="indefinite" />
  </rect>
</svg>Visual Example
Why use <animateTransform> in SVG?
It is an ideal option to create automatic and smooth animations without depending on style sheets or external scripts. Perfect for logos and dynamic graphics on the web.
✅ Advantages:
- Native animations in SVG without needing JavaScript or CSS.
- Compatible with all modern browsers.
- Simple for basic effects like moving, scaling, or rotating.
❌ Disadvantages:
- Less flexibility than CSS or JavaScript for complex animations.
- Does not allow custom interactions or event responses.
Using CSS with transform: translate()
You can use CSS to move SVG elements using transform: translate(). This property applies to elements identified by their id, class, or tag name, and is especially useful when the SVG is embedded directly inside the HTML code.
It is important to understand that transform="translate(x, y)" inside SVG and transform: translate(x, y) in CSS have a similar effect: both visually shift an object from its original position. The key difference is that one is applied directly to the SVG element attribute (native to SVG) and the other is used as an external or embedded CSS style rule, allowing greater flexibility and organization in web design.
At creadorlogos.com, this method allows me to keep the SVG code clean and handle movements from an external CSS file, just like you would with any other HTML element such as buttons, images, or containers.
Example Code
<style>
  #miRectangulo {
    transform: translate(50px, 50px);
  }
</style>

<svg width="200" height="200" xmlns="http://www.w3.org/2000/svg">
  <rect id="miRectangulo" x="10" y="10" width="50" height="50" fill="orange" />
  <rect id="sinmodificarporcss" x="10" y="10" width="50" height="50" fill="blue" />
</svg>Visual Example
How to move SVG elements with CSS?
Using CSS allows applying transformations and animations to SVG elements embedded in HTML as if they were any other web design component. This technique is very useful for separating styles from content and leveraging the full potential of modern CSS.
✅ Advantages:
- Clear separation between structure (HTML/SVG) and styles (CSS).
- Compatible with transitions, animations, and media queries.
- Ideal for SVGs embedded in HTML needing responsive or dynamic behavior.
❌ Disadvantages:
- Cannot be applied if the SVG is loaded as an external image (
.svgin<img>orbackground-image). - Less integration with internal SVG attributes like
transformoranimateTransform.
JavaScript to Dynamically Move Elements
JavaScript is a programming language that expands the possibilities of interaction with HTML and SVG elements. With it, you can move SVG elements by accessing them via their id or class, and modifying attributes like transform or coordinates directly.
Remember that an SVG is text in XML format, so with JavaScript you can also modify its structure, create new elements, or change any property, although that is an advanced topic we will cover in another tutorial. For now, we will show you how to make basic movements simply.
At creadorlogos.com, I use JavaScript to create dynamic interactions that respond in real time, such as moving an element when the user performs an action.
Basic Code to Move an SVG Element
<circle id="miCirculo" cx="50" cy="50" r="40" fill="blue" />
<script>
  let circulo = document.getElementById("miCirculo");
  circulo.setAttribute("transform", "translate(100, 0)");
</script>Visual Example
Why use JavaScript to move SVG elements?
Using JavaScript to move SVG elements gives you total and dynamic control over your graphics. You can respond to user events, create custom animations, and change properties in real time, making your logos and designs more interactive and attractive.
✅ Advantages:
- Allows real-time interactions with SVG elements.
- Total control to create custom movements and animations.
❌ Disadvantages:
- Requires basic JavaScript knowledge.
- For very complex animations, it can be slower than specific SVG or CSS methods.
For now, this basic method will allow you to move objects within an SVG like any other web element, but with the power offered by programming. Later we will explore how to create and modify complete SVGs with JavaScript.
Matrix Transformation Method in SVG
The transform="matrix(a, b, c, d, e, f)" method is the most advanced for transforming SVG objects. The last two values (e and f) indicate horizontal and vertical translation or movement, while the first four control scaling, rotation, and skewing.
What does each value mean?
To help you understand better, these six numbers do the following:
- a, b, c, d: control how the object stretches, rotates, or skews.
- e, f: move the object horizontally and vertically (as if dragging it).
At creadorlogos.com, I use this method for complex transformations and advanced animations. Although it is harder than other simple transformations like translate() or rotate(), mastering it gives you total control over SVG design.
Code
<rect x="10" y="10" width="50" height="50" fill="purple" transform="matrix(1, 0, 0, 1, 50, 30)" />Visual Example
Why use transform="matrix()" in SVG?
This method combines multiple transformations (moving, rotating, stretching) into a single line of code. It is perfect for complex animations or when you need to control all aspects of the movement and shape of the object.
If you are starting out, I recommend using simple transformations first like translate() to move or rotate() to turn. Gradually you will be able to master matrix() and create more advanced animations.
✅ Advantages:
- Allows combined advanced transformations (translation, rotation, scaling).
- Ideal for complex and precise animations.
❌ Disadvantages:
- Harder to understand for beginners.
- Requires basic matrix knowledge to fully leverage it.
With these methods, you can move elements in SVG so your logo or design looks exactly as you imagined. My favorite is matrix() for its power in advanced animations, but translate() and animateTransform are perfect for quick adjustments and dynamic movements. At creadorlogos.com, we offer visual tools to simplify this entire process.
How to Easily Move an SVG in creadorlogos.com?
We know that creating an SVG graphic from scratch with code can be very complex. Although it allows you to connect it to databases, use JavaScript, and control every pixel, it is not always the most practical if you just want to design a vector logo in a few minutes.
Professional programs like Adobe Illustrator or Inkscape are powerful, but they require a steep learning curve. Instead, with creadorlogos.com you can create animated SVG logos visually and quickly, without knowing code.
1. Choose your object
Once you have your logo composed of shapes, text, icons, or images, simply click on the object you want to move. You can also select it from the right-hand panel where all stage elements are listed.
2. Press the movement star
When selecting an object, you will see a movement star with directional arrows. From there you can move it in any direction: north, south, east, or west. You can even rotate or adjust it from the corners.

3. Adjust movement precision
Want to move the object pixel by pixel for maximum precision? Use the potentiometer-style slider bar that allows you to control how much the object will move with each click. The lower the value, the smoother and more detailed the adjustment.
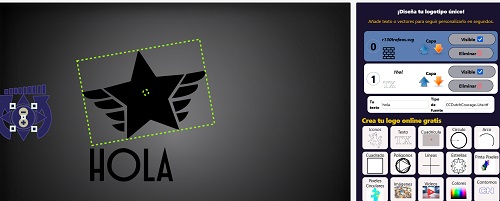
Result: animated and customized vector logos
With this tool you can adjust each element of your logo in real time without touching a single line of code. All your design is saved as an editable and vector SVG file.
When you are done, there is only one final step left: download your logo in SVG format (ideal for printing and responsive web), or as a PNG image with a transparent background, perfect for social media, websites, or documents. And if you are curious... look at the automatically generated SVG code and you will see how your design was built line by line. You will learn without realizing it!
Start moving your SVGs nowWhere else can you use these techniques?
Moving SVG elements is not only useful for logos, it is also helpful for:
- Web animations: Create dynamic banners or menus.
- User interface: Move icons in mobile apps or dashboards.
- Presentations: Add transitions to charts in slides.
- SVG games: Design characters that move across a stage.
- Educational material: Create interactive diagrams that move to explain concepts.
Learn more about SVG design and advanced animations at creadorlogos.com/crear-logos.php. Register and start creating today.

